Manual Entry of Excel Data into TallyPrime
In Tally Prime, using Mapping Templates allows you to streamline the import of accounting transactions, including those with GST amounts, directly from an Excel file. Mapping Templates help you map the fields in your Excel file to the appropriate fields in Tally, ensuring that data like GST amounts are correctly imported and categorized.
Here’s how you can create accounting-only transaction entries with GST amounts using Mapping Templates in Tally Prime:
Step-by-Step Guide to Create Accounting-Only Transaction Entry with GST Amount in Tally Prime Using Mapping Templates
Prepare the Excel File for Accounting Entries with GST
Before using the mapping template, you need to have your Excel file ready with the relevant accounting data.
Create an Excel sheet that contains the following fields (columns):
- Date: The date of the transaction.
- Voucher Type: This will be either Sales or Purchase, depending on the transaction.
- Invoice Number: Unique identifier for the invoice.
- Ledger Name: The account names (Customer, Supplier, or Expense/Revenue Ledger).
- GST Ledger: The ledger used for recording GST, such as CGST, SGST, or IGST.
- Amount: The taxable amount.
- GST Amount: The GST amount based on the applicable rate.
- Total Amount: The total amount including GST.


Steps to Access and Create a Mapping Template in Tally Prime:
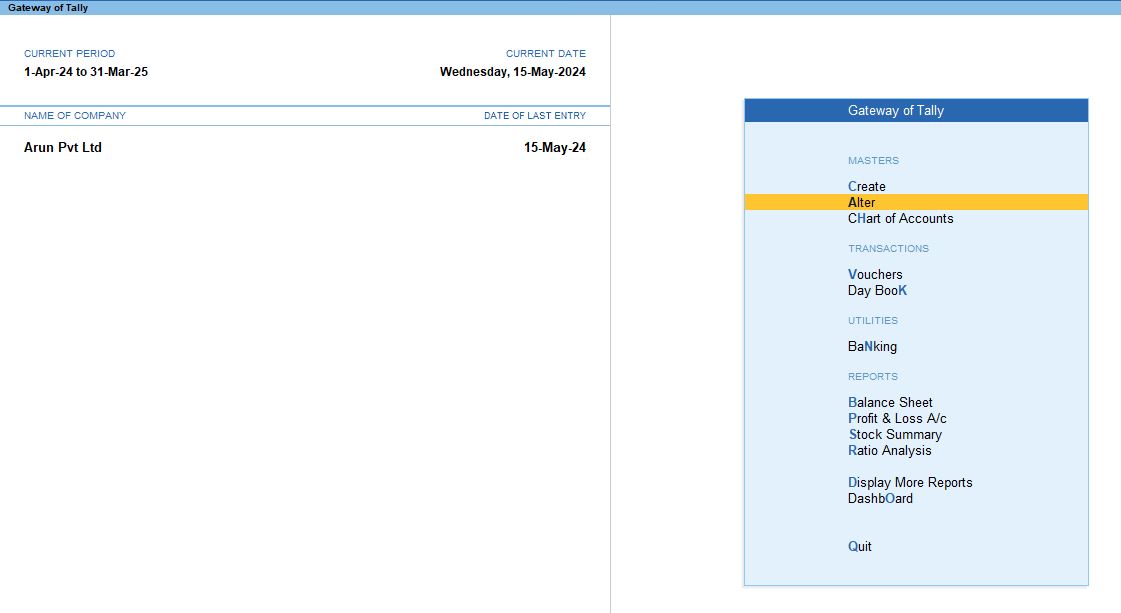
1. Open Tally Prime
- Launch Tally Prime on your system.
2. Enable GST in Tally Prime
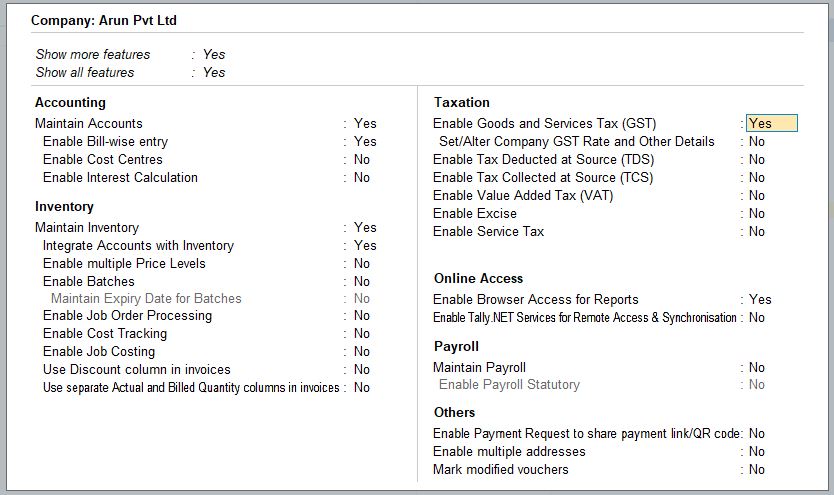
Ensure that GST is enabled in Tally Prime before importing data.
- Go to Gateway of Tally>F11 (Features)>F3 (Statutory & Taxation).
- Set Enable Goods and Services Tax (GST) to Yes.
- Configure the necessary GST details, including GST registration number and applicable tax rates.
3. Go to Import Data
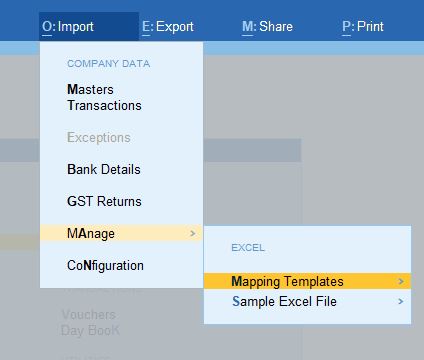
- From the Gateway of Tally, press Alt + O or navigate to Utilities>Import Data.
4. Select the Type of Data to Import
Tally will prompt you to select the type of data you want to import. Options include:
- Masters (for Ledgers, Stock Items, etc.)
- Vouchers (for accounting transactions, including GST transactions)
Choose the appropriate option depending on the data you are importing (for example, Vouchers for accounting transactions).
5. Choose to Create or Use a Mapping Template
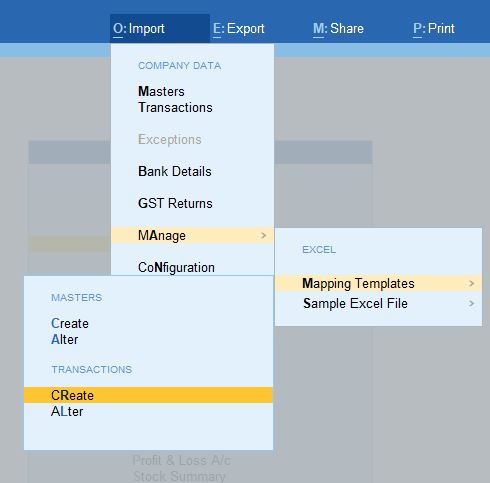
- On the import screen, you will see an option to Select or Create Mapping.
- If a template has already been created, you can select it from the list.
- To create a new template, choose the option Create.
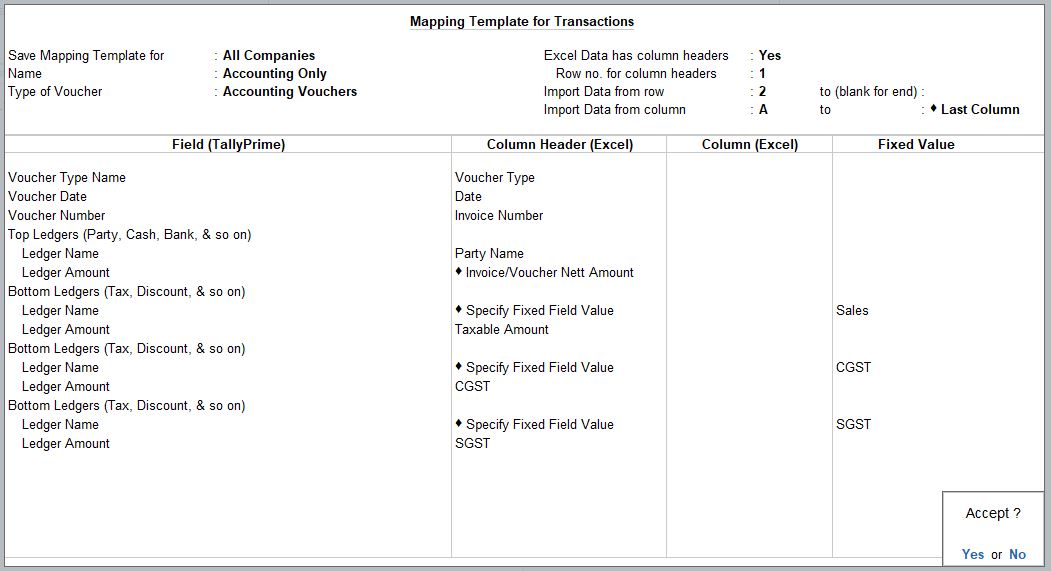
6. Define the Mapping Template
In the mapping template creation screen:
- Name your template (e.g., “GST Accounting Transactions”).
- Map the fields from your source file (Excel or XML) to the appropriate fields in Tally Prime.
In the mapping screen, map the columns from your Excel file to the appropriate fields in Tally. For example:
- Date (Excel) → Voucher Date (Tally).
- Invoice Number (Excel) → Reference Number (Tally).
- Ledger Name (Excel) → Party Ledger Name (Tally).
- Amount (Excel) → Taxable Amount (Tally).
- GST Ledger (Excel) → GST Ledger Name (Tally).
- GST Amount (Excel) → GST Amount (Tally).
- Total Amount (Excel) → Total Invoice Value (Tally).
7. Save the Mapping Template
- After mapping all the required fields, press Enter to save the template.
8. Use the Mapping Template to Import Data
- Now, when you import data in the future, you can select this saved template to ensure the correct fields are mapped.
- Enter the path of your Excel file or data source, and start the import.
Import Accounting Transactions with GST into Tally Prime
Now that your mapping template is ready and GST is configured, you can proceed to import the accounting transactions.
Go to Import Data:
- From the Gateway of Tally, press Alt + O or navigate to Utilities>Import Data.
Select Vouchers:
- Choose Vouchers for importing accounting data.
Choose the Mapping Template:
- Select the template you created (e.g., "GST Accounting Template").
Provide the Excel File Path:
- Enter the full path to the Excel file containing your accounting transactions with GST.
Configure Import Settings:
Configure any other settings such as:
- Overwrite Existing Entries (optional).
- Date Range (if applicable).
Start Import Process:
- Press Enter to start the import. Tally will map the fields using the template and import the transactions, including the GST amounts.
9. Verify Imported Transactions
Once the import is complete, you should verify that the accounting entries were imported correctly with GST amounts:
- Go to Display>Day Book or check GST Reports to ensure the transactions appear with the correct GST details.
- Also, verify the Ledger Reports to see if the GST ledgers (CGST, SGST, IGST) have been properly credited or debited based on your transactions.
Tips:
- Correct GST Ledgers: Ensure that the GST ledgers (CGST, SGST, IGST) are correctly created and mapped in Tally, as errors in ledger names will cause import issues.
- Taxable and Total Amounts: Double-check that your Excel file separates taxable amounts and GST amounts correctly.
- Save Multiple Templates: You can create different mapping templates for different types of data (e.g., one for Sales and one for Purchase transactions).
By using Mapping Templates and following the correct Excel format, you can easily import accounting transactions with GST into Tally Prime.
Tally Prime
Learn All in Tamil © Designed & Developed By Tutor Joes | Privacy Policy | Terms & Conditions