Import Ledgers from Excel into Tally Prime
Steps to Access Sample Excel File in Tally Prime
1. Open Tally Prime:
- Launch Tally Prime from your system.
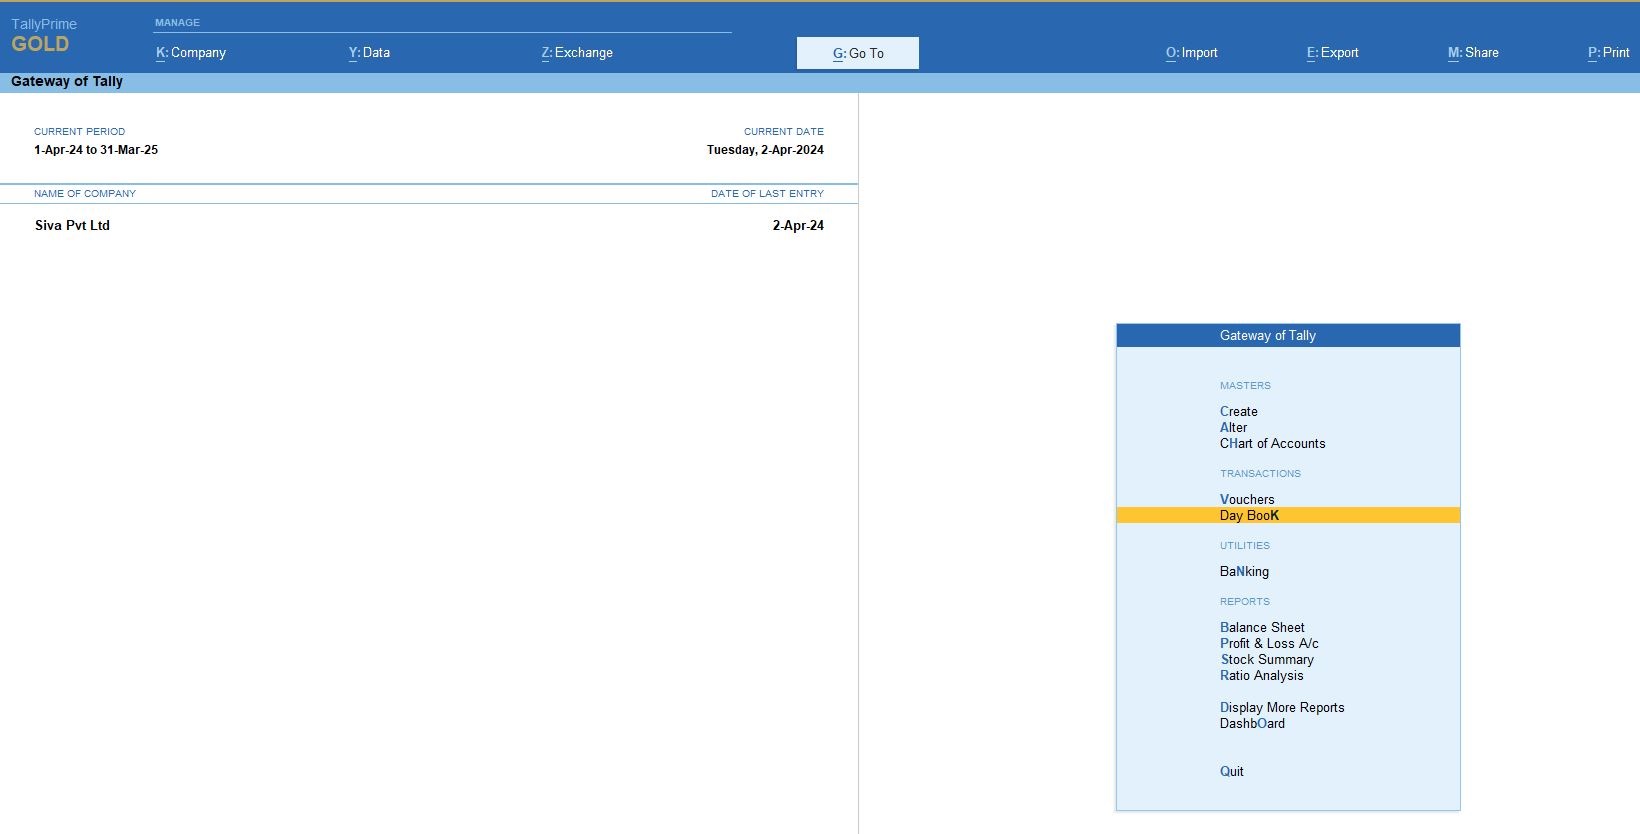
2. Navigate to Import Data:
- From the Gateway of Tally, press Alt + O to access the Import Data option, or navigate manually:
- Go to Gateway of Tally -> Utilities -> Import Data.
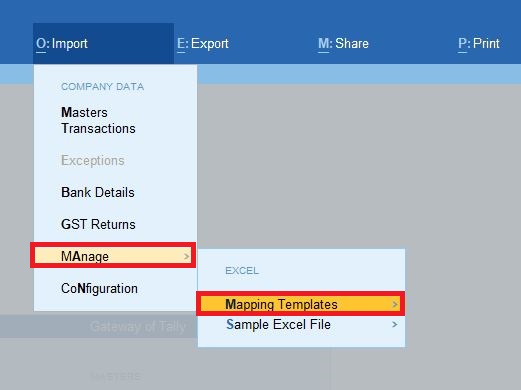
3. Select the Data Type to Import:
- Depending on what you need to import (masters, vouchers, etc.), choose the appropriate option:
- Masters (like ledger, stock item)
- Vouchers (for sales, purchases, payments, etc.)
- For example, choose Masters if you want to import master data such as ledgers or stock items.
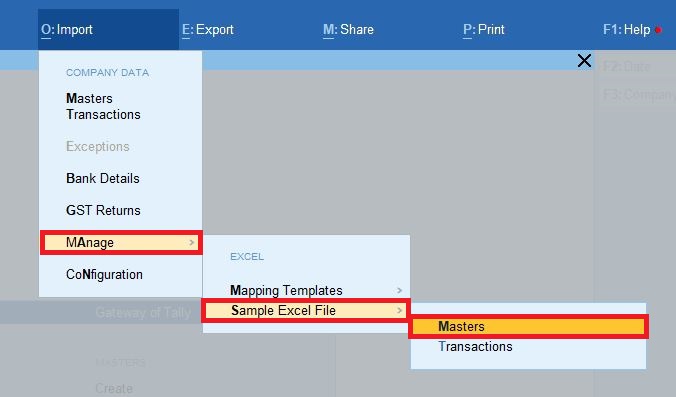
4. Sample Excel Format:
- After selecting the data type, Tally will prompt you to import data from an Excel or XML file.
- You'll see an option to download the Sample Template or Sample Excel file for that specific data type.
- Tally will provide an Excel format or template that you can use to structure your data correctly before importing into Tally.
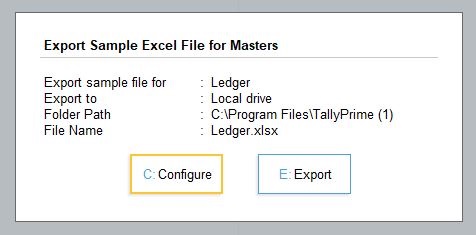
5. Exporting Data to Excel (to Get a Sample Format): If you don't see a direct link to the sample file, you can export existing data from Tally to Excel to use it as a reference:
- Go to Gateway of Tally>Display>List of Accounts or Vouchers.
- Press Alt + E (Export), and choose Excel as the format.
- Tally will export the data in the correct format that can be used as a sample template for importing.
6. Modifying the Sample Excel File:

7. Import the Excel File:
- Once your Excel file is ready with the proper data, go back to Import Data.
- Specify the path of the Excel file you’ve prepared, and proceed with the import process.
8. Prepare Your Excel Sheet
- You’ll need to structure your Excel sheet in a way that Tally Prime can understand. Here’s how you can do it:
- Columns in Excel:
- Ensure your Excel sheet has the following columns (these are typical fields you might use):
- Ledger Name
- Under Group (e.g., Sundry Debtors, Sales Accounts, etc.)
- Opening Balance
- Debit/Credit (to specify whether the opening balance is a debit or credit)
- Address (optional)
- State (optional)
- GST Number (optional)
- Contact Details (optional)
- Fill in the Data:
- Enter the relevant details for each ledger in the corresponding columns.
- Save the Excel File:
- Save the Excel file in a location that is easily accessible.
9. Convert Excel to XML Format
Tally Prime doesn’t directly import Excel files. You need to convert the Excel data into an XML file, which Tally can read. Here’s how you can do it:
10. Use TDL (Tally Definition Language):
You can write a TDL script to convert Excel data to XML format. However, if you're not familiar with TDL, it's easier to use third-party tools or services that convert Excel to Tally XML.
11. Manual Conversion:
Alternatively, you can manually convert the Excel data into an XML file if you're familiar with the XML format required by Tally.
Go to Create New Company:
- On the Gateway of Tally screen, you will see an option called Create Company.
- You can also press Alt + K(Company menu) and select Create.
Enter Company Information:
- Fill in the following details for the new company, Arun Pvt Ltd:
- Company Name: Arun Pvt Ltd
- Mailing Name:(This can be the same as the company name or different if required)
- Address: Enter the address of the company.
- Country: Select the country where the company is located.
- State: Choose the state from the dropdown list.
- PIN Code: Enter the postal code.
- Phone Number: Add the company's phone number (optional).
- Email: Add the company's email address (optional).
Financial Year and Books:
- Financial Year Beginning From: Enter the starting date of the financial year (for example, 01-Apr-2023).
- Books Beginning From: Usually the same as the financial year, unless you want to maintain records from a different date.
Security Control (Optional):
- You can set up a username and password for security purposes. If you don’t want this, leave it blank.
Base Currency Information:
- Choose your currency (e.g., Indian Rupee).
- Modify any other currency settings as needed (e.g., number of decimal places).
Save the Company:
- After entering all the required details, press Ctrl + A to save the company.
Company Opened:
- You will be taken to the Gateway of Tally screen with the newly created company, Arun Pvt Ltd, now open.

Import XML File into Tally Prime
Once you have the XML file, you can import it into Tally Prime:
Open Tally Prime:
Start Tally Prime and load your company.
Import the XML File:
- Go to Gateway of Tally > Import of Data > Masters.
- Select Masters because you are importing ledger masters.
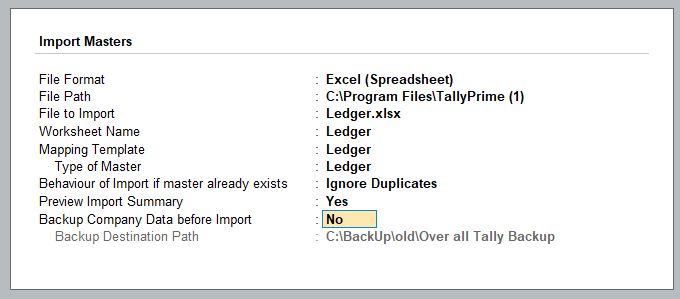
- In the Import File Name field, enter the path of the XML file you prepared.
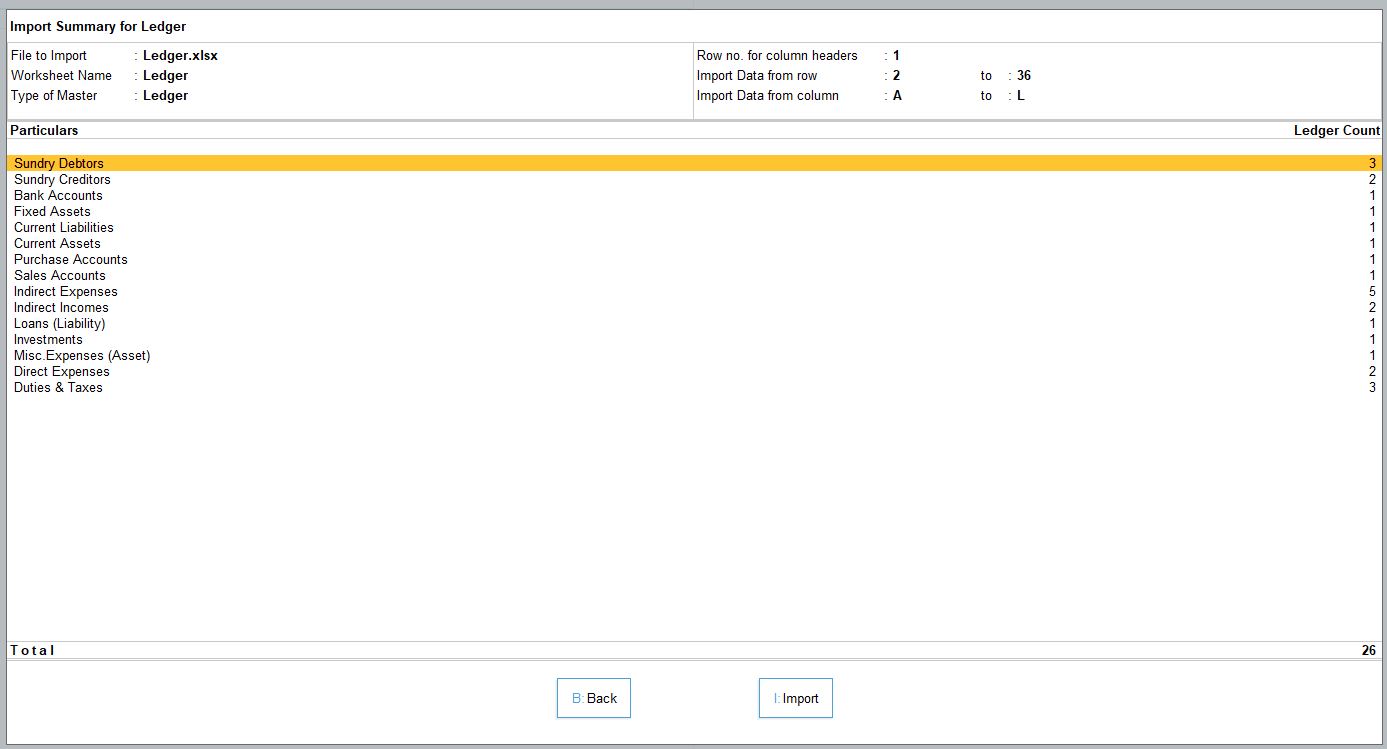
- Tally will display a confirmation screen with details of the ledgers to be imported.
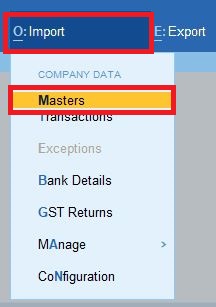
Confirm Import:
Press Enter to confirm and complete the import process.
Verify Imported Ledgers
After the import, verify that all ledgers have been imported correctly:
- Go to Gateway of Tally > Accounts Only > Ledgers > Display.
- Check if all ledgers are listed with the correct details.
Troubleshooting Tips
Data Validation: Ensure that all data in your Excel sheet is accurate and formatted correctly, as any errors might cause the import to fail.
Backup: Always take a backup of your Tally data before performing any import operation.
Prepare Your Excel File
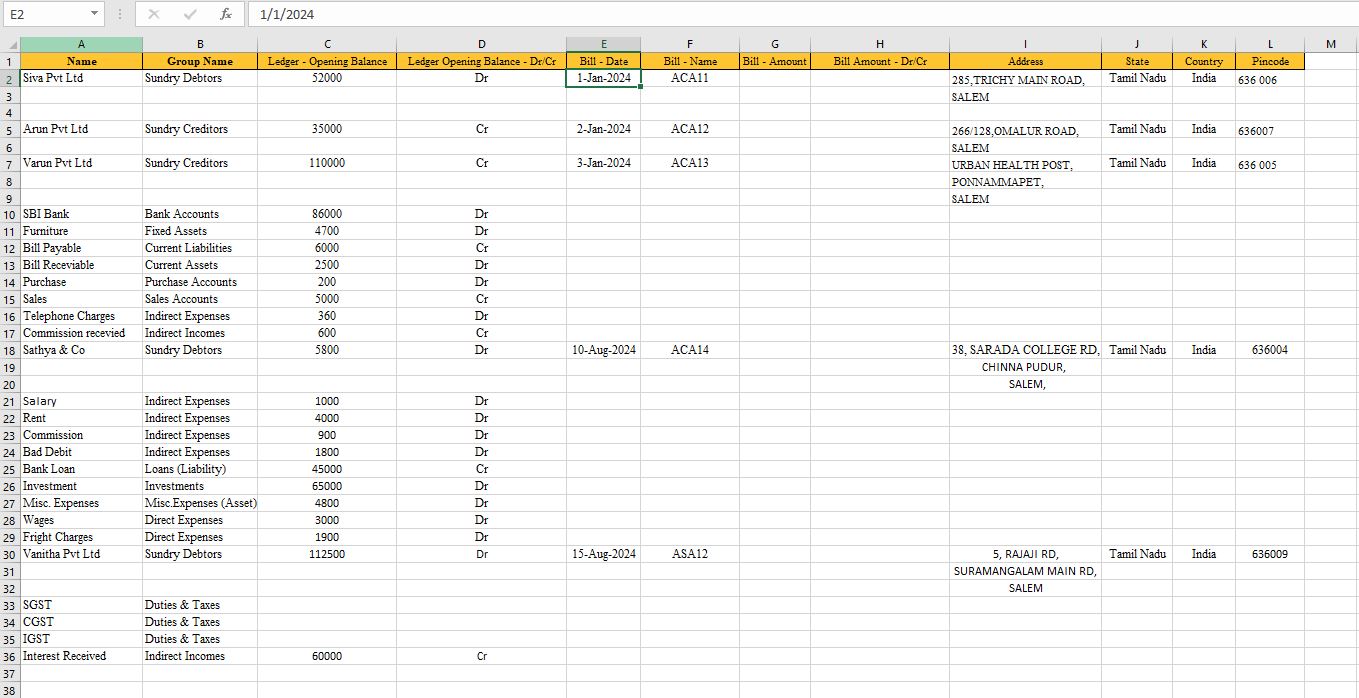
Column Headers: Your Excel file should have the necessary columns that match the ledger data fields in Tally. For example:
Name of Ledger
Under Group (e.g., Sundry Debtors, Sales Accounts, etc.)
Opening Balance
Debit/Credit (to indicate whether the opening balance is a debit or credit)
Additional details like Address, GST Number, State, etc., if needed.
Here’s an example structure:
| Name of Ledger | Under Group | Opening Balance | Debit/Credit |
|---|---|---|---|
| Arun Pvt Ltd | Sundry Creditors | 35000 | Cr |
| Bad Debt | Indirect Expenses | 1800 | Dr |
| Bank Loan | Loans (Liability) | 45000 | Cr |
| Cash | Cash-in-Hand | 2500 | Dr |
Convert Excel Data to XML Format
- Since Tally Prime does not directly accept Excel files, you need to convert the Excel data into an XML format that Tally can import.
- Using a TDL Script: If you are familiar with Tally Definition Language (TDL), you can write a script to convert Excel data to XML.
- Using Third-Party Tools: There are tools available online that can convert Excel data into the Tally-compatible XML format.
- Manual Conversion: If the data set is small, you can manually create an XML file by following Tally’s XML structure.
Import XML File into Tally Prime
- Open Tally Prime: Start the Tally Prime software and load the relevant company.
Navigate to Import Menu:
- Go to Gateway of Tally > Import of Data > Masters.
- Select Masters since you are importing ledger information.
Import the XML File:
- In the Import File Name field, enter the path of the XML file you created.
- Tally Prime will display a preview screen showing the ledgers that will be imported.
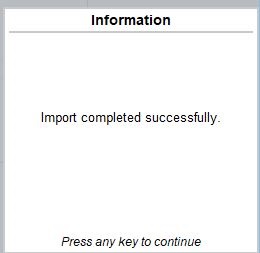
Confirm Import:
- Press Enter to complete the import process. The ledgers should now be available in your Tally Prime.
Verify Imported Data
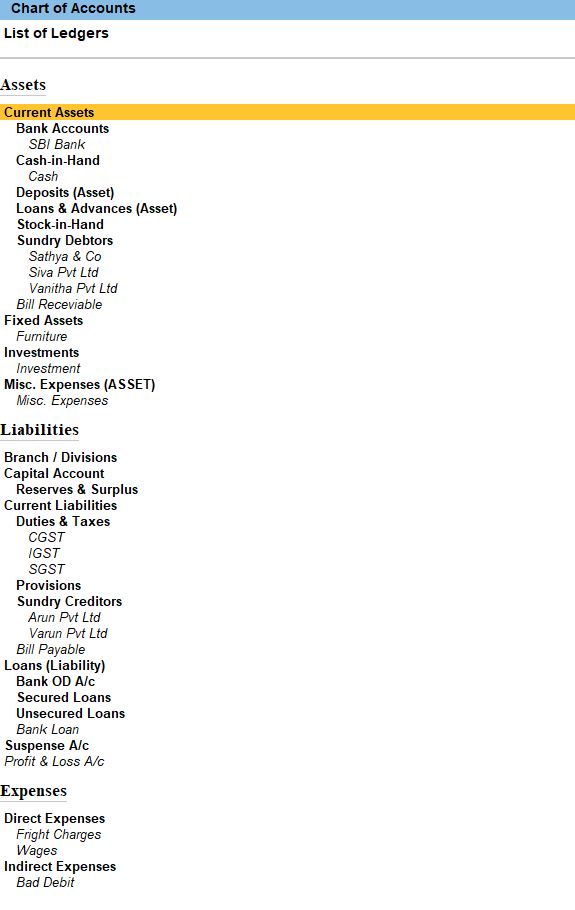
- After importing, you can verify the data by navigating to Gateway of Tally >Chart of Accounts > Ledgers > Display. Here, you should see all the ledgers that were imported.

Summary
- Prepare the Excel file with the correct ledger data.
- Convert the Excel data to Tally-compatible XML format using a TDL script or third-party tool.
- Import the XML file into Tally Prime through the Import of Data option.
- Verify the imported ledgers in Tally Prime to ensure accuracy.
- This process allows for efficient bulk entry of ledgers into Tally Prime, which is particularly useful when setting up new company data or migrating from another system.
Tally Prime
Learn All in Tamil © Designed & Developed By Tutor Joes | Privacy Policy | Terms & Conditions